Friday, June 30, 2017

Here We Go Again!

Don't worry that's Steve's on the wagon - he has a mimosa!
We have friends who have moved to Singapore, so we decide to visit them and to tack on another fairly close location, the Maldives.  We start off arriving late in the evening at Changi International Airport, but it's a quick trip to our hotel and a good night's sleep.

The next morning we quickly realize we're no longer in Tokyo.  We're enter the hotel elevator and the person inside says hello.  Then we stop at another floor and a couple gets on, and also starts talking with us.  That never happens in Tokyo - it's practically a rule that no one speaks on the elevator.

After breakfast we walk around and take the MRT (subway) to The Arcade, which hosts multiple money exchange facilities, among other shops and restaurants.  Downtown Singapore is set up so you can do a lot of walking inside and underground, so you can stay in air conditioning. It's not restricting though, because many times there are openings to the outside or there's a courtyard so you see sunlight and get fresh air.  (We realize this after we wander at street level for about 15 minutes in the heat and humidity, and only see one other couple holding a large paper map, obviously also tourists - everyone else knows to limit their exposure to the outside.)  They air condition here like they do in the southeast US - as cold as possible!  Unlike Japan, where I keep sweating when I enter a building because the thermostat is set at around 78 degrees.  In Singapore it feels like 68.  It's very refreshing, and reminds me of home!

Our next stop is to a nearby quilt shop, Quilts and Friends.  It's at The Adelphi building at 1 Coleman St, #03-09.  Steve figures out the numbering system first - the 03 refers to the floor level (third floor) and the 09 is the shop number.  Many businesses are inside a mall/department store type building, so they use this address arrangement to help you find places faster.  It's a small store, and expensive - fabrics on the bolt start at $15 USD a meter.  They have a back room where a class is taking place while I'm there, and a limited amount of notions.  Once again, I'm distracted by the fabric and I forget to take pictures.  Though I don't buy anything it's nice being in a "typical" quilting store again.

Arab Street

Steve contemplating the choices
Fabric is the focus for today, so then we visit Arab Street.  It's a couple of blocks of fabric stores, rugs, and trinket shops (I love the glass shade lamps, but don't buy one because I can't figure out how to safely bring it home).  Steve resists buying the $4000 3'x5' rug, and I resist buying silk for $40-55/meter.  I just don't know enough about sewing with it to justify spending that much money.  Because the street is full of shop after shop of fabric stores, before we leave I researched the ones I should check out.  We start off at 51 Arab St,  Mahaco Impex, which is where I spend the most time looking at the silk and ready made products.  I wasn't impressed with the quality of the pre-made items (poor sewing skills), but the silk looks beautiful and the proprietor is very helpful. This is also the place I saw mentioned the most on other people's blogs.
 
one of the many rug stores

I finally remember to take a picture!  Here's one side with
fabrics on the bolt and some clothing...
In addition to silk the street is known for carrying batiks.  I had hopes I might find quilting batiks, but no luck.  It's mostly traditional designs from Indonesia, with very few Malaysian style batiks.  You can find fabric on the bolt, in sarong length cuts (about 2 meters) and premade clothing items.  One of my favorites is at 101 Arab St, Basharahil Bros, where I buy a shirt and several yards of batik fabric off the bolt.

the front sign

...and here's the other side with more batik clothing.


At 91 Arab St, Toko Aljunied I buy some sarongs, including one that has a "quilting batik" look.  I haven't decided whether or not I'll cut it up for a quilt.  He has many different quality levels of batiks, including completely handmade items.  Unfortunately (or fortunately for my wallet) I just didn't like the patterns or colors enough to purchase any of them, though I love the idea of a completely handmade batik fabric.

my purchases at Toko Aljunied

I just remembered to take a picture of the sign.
The shop at 107 Arab St, Jasco Fabrics, has sarong cuts of pretty Indonesian batiks with metallic gold.  I almost miss them as I wander around the shop, because they're located at shelves right beside the entrance.  I limit myself to two in the same pattern but different color ways.  

The sidewalk is similar to Bali - a covered walkway with merchandise displayed along it.  But it's much cleaner here, and proprietors are not constantly asking you to enter their shop.  It makes for a more enjoyable experience.

While we wander the street, for the first time I see, in person, a woman wearing a full burka. I may have committed a faux pas - I'm wearing long shorts, but we're in the Muslim part of the city. If I thought about it I would have put on pants, even though no one says or does anything.  I see a few other women wearing shorts or skirts. However, most of the women are in pants and headscarves (she was the only burka I saw). 

I think Steve picks this cafe because his shirt coordinates with the table cloth.
While I'm inside a shop Steve scouts out a lunch location.  There's plenty to pick from on the street!  We haven't had Greek/Mediterranean food in forever (there has to be some in Tokyo - we just need to look), and we feast on fresh pita bread, hummus, baba ghanoush, tabouli etc, and finish with baklava!  I see lime juice on the menu, try it and like it, before realizing it's a standard drink in Singapore.  It's very refreshing on a hot day!  (Though everyone's telling us it's not so hot today...hmmm, it's feeling around 90 degrees to me.)  There's also a quick thunderstorm while we're at the restaurant, so it's a good time to take a break from shopping. 

Our final stop in this area is Kiah's Gallery at 71 Sultan Gate, right before the entrance to the Malay Heritage Centre, a few blocks from Arab St.  She sells handmade batik clothing for men and women, and can do custom orders and adjustments.  Unfortunately her available items are not in the style I prefer or too small (she only has one size of each item).  The owner and her husband are wonderful to talk with as I look at the items.  One of the nice aspects of Singapore is English being the primary language (though there are four official languages).  All the signs, menus, etc are in English, and everyone speaks it, making it much easier on us.  It also feels very multicultural in Singapore. There's much more variety in the nationalities of people than in Japan. You also see many different foreign stores here.  Just riding down the street I notice US (Sephora), British (Marks and Spencer, Lush), even Japanese (Muji, Uniqlo, Takashimaya) shops here. 

Not many people are able to look DOWN at the Marina Bay Sands observation deck!

Later this evening we take advantage of a reciprocal club agreement between the Tokyo American Club and the Tower Club Singapore. Why pay $18/ person to go to the Marina Bay Sands observation platform when we can go 8 stories higher for free, and enjoy a drink at happy hour prices? (Total coincidence - we weren't aware of happy hour at the time.) We enjoy sitting and checking out the 360 degree view, and of course we can't resist trying to take a selfie with Marina Bay Sands in the background.

View #1 of Singapore


View #2 of Singapore


View #3 of Singapore


The light makes it difficult to see us and the scenery.  Back to the instruction manual!

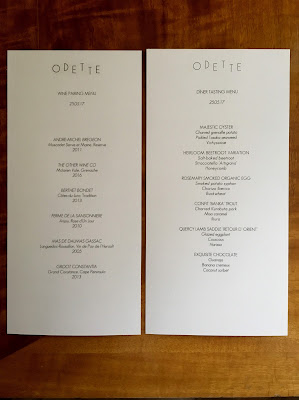
We plan for one "nice" dinner while in Singapore, and I'm able to make reservations at Odette, rated as #9 for Asia's Best Restaurants, #86 for World's Best and has two Michelin stars.  We think it's our favorite of the Michelin star restaurants we've visited.  

How sweet - the restaurant is named after the chef's grandmother.
Odette is only a ten minute drive away from the Tower Club Singapore, but we discover the taxi problem here -  you can't get one between 5:30-7:30pm.  Luckily, we're able to get Uber, and we're only a few minutes late for our reservation. The restaurant is inside the National Gallery, and because no one is exactly sure where the Supreme Court foyer entrance is (the recommended entrance on the restaurant's website), we end up walking the entire length of the building to find it. But it ends up being worth it, because the food is fantastic and the small portions are very filling. The food is very whimsical, and I joke the chef put together each dish based on the color of the items.

We're sent home with copies of the menus and a jar of jam.


We have two tasting menus to choose from, and one of them is all Japanese items.  That makes it easy for us to pick the other one.  Surprise, surprise, we also pick the accompanying wine pairings, too.  Unlike L'Effervescence, It's more than just a taste of wine per course. 


We found it!  And they don't give away our reservation because we're late!

The kitchen is visible from every seat in the dining room.

Pretty presentation!

I love the colors in this dish!  Who knew beets could taste so good?

Foam may be overdone, but I always like smoke at my table!

lots of lamb


the (additional) cheese course
The one item I'm unhappy about is the presentation of the cheese course.   Though it's listed near the bottom of our menu, without a separate price, it's not included.  When the cheese is displayed for us, our server does not mention it's an extra price.  We're getting full at this point, so we would have skipped it if we had known it was an additional $30.  In Singapore, we found "upselling" to be a common feature (more on that later).  

Cucumber sorbet with lemon and basil -  palate cleanser before dessert!

Ask Steve when the actual date is - see how long it takes him to answer!


As one of the dessert courses, we celebrate our anniversary (again). It's really close this time, though!


Sunday, June 25, 2017

Another BOM Top!

So somehow I accidentally sign up for another 2016 mystery block of the month through my guild back home.  Once registered I feel obligated to work on it, though the instructions arrive by email instead of snail mail, so it's not as exciting when they appear.  However, it does mean I receive them at the beginning of each month!

Starting the fabric selection process...
For this project I decide to use fabrics I've purchased while living in Japan.  I have a beautiful red Asian print fabric, and decide to work off of its colors.  January's instructions recommend a scrappy look with multiple fabrics in lights, mediums and darks, but I'm not a big fan of scrappy quilts.  I try to choose one color in multiple shades, with help from my color wheel to make sure I don't change color families.


Checking light, medium and dark together


This is truly a block of the month and each set of directions has us complete one square.  Once again I hold off until Alaina's quilt is finished before beginning, so it's not until summertime that I catch up.  I figure each month will go quickly, until I actually start working on it.  There are some little pieces to deal with!  I decide to change out my thread, because when working with smaller pieces any mistake is much more noticeable.  I had been using Mettler 50 weight, but switched to Aurifil 50 weight so I have a little more control over the 1/4" seam allowances.  (Yes, since they're both 50 weight they should technically be the same thickness, but like women's clothes, size is not consistent among different brands.  So the Aurifil is a thinner thread.)  I love my Janome MC 6600, which I've used for nine years, but the most common complaint about it is that it will not sew a true 1/4" seam. (If only the needle would go to 4.45 position!)  I try to compensate by using a thicker or thinner thread for piecing, and now I'm aware to double check my pressing skills, too.

Lights and mediums - though I actually do some more rearranging, and pull out the clay fabric and the green on the bottom right to use in Laurel's graduation quilt.

A variation of the Corn and Beans quilt block?  I'm not sure of it's name.


This is my favorite block of the eight we sew.  Each month it seems like the instructions give us a different method to sew an hourglass square or flying geese rectangle.  This block also has the clay fabric that I searched all of Tokyo looking for additional yardage, but had no luck in finding.


As I continue along on the project, the blocks make a pretty border at the top of my design wall.  It also adds a little color to the living room.

Hmmm....maybe I should put quilt blocks below the ceiling moldings in my house.

I'm not really liking the multi-color, set-in triangles.
When we reach the point of putting the top together, I'm unhappy with some of my fabric choices.  The February instructions have us cut out triangles of medium and light fabrics.  However, it gives my quilt a scrappy look, which I don't particularly like - it overwhelms all the piecing I do in the squares.  Luckily, I have enough green and gold fabric to cut out new triangles.

I decide to keep the alternating gold and pink triangles around the blocks, but fill in the remaining center triangles with green, so I have a consistent "background."  Much better!  I also start pulling out the fabrics for the borders, to see if I'll like them.

Much better!

Testing this fabric for the border - is there enough contrast with the center? (There is, but I decide not to use it.)

Once I sew the border together, the
center pink hourglass will no longer
line up with the center pink triangle
I should have known the border wouldn't be so simple!  When the December email arrives, we're to take the squares and make them into hourglass blocks.  Very appropriate, considering how many of the squares have the same shape.

Once they're made, I spend some time choosing their placement on the quilt.  I don't want an hourglass block with pink to line up with pink on the quilt center - it will form a strangle looking line on the quilt.  Each hourglass block is made with a pair of medium fabrics and a pair of light fabrics, so I also have to triple check to make sure I have a medium pair horizontal, then vertical, then horizontal, etc throughout the border.  It takes a few hours, but I think I finally have them all arranged as best as possible.  Again, this is a mystery, so I chose the fabrics without knowing what the final design looks like.  If I were to change something in the future, I would not use the same fabric in the hourglass border that I use in the set-in triangles (the light green batik).  They tend to blend the center and border together, instead of making a distinct separation.  I'd probably also use the same 3-4 fabrics in all eight of the pieced quilt blocks.

Can't forget to check the bottom border, too!
Once I have the hourglass border and thin green border added, I hesitate to add the final dark border.  In the end, I decide to sew it on - it makes a nice frame for the quilt.  I'm not sure what I'm going to name it, but those soft greens, golds and pinks make me think of sherbet, so I'm leaning towards Sherbet with a Cherry on Top.

Maybe this is telling me I need to go eat an ice cream sundae!

Wednesday, June 21, 2017

Not a Finish...But a BOM Top

In 2016 my quilt guild back home participated in a block of the month mystery quilt (or really, step of the month).  Each month we would receive a cute little message and one step in the instructions to complete the quilt.  I'm able to talk the administrator in charge (who's also a friend) into sending them to me in Japan.  We don't receive a lot mail in Japan (3 bills, occasionally a note from the apartment complex about window washing and maybe 3 pieces of junk mail each month), so it's very exciting when a letter appears.

the final selection
The first step involves choosing our fabrics.  It's easy to find fabric in Japan (read about Nippori here, Chain Stores here, West Tokyo here and East Tokyo here), but it's not always my favorite style, batiks.  I'm at Yuzawaya, and I want to pick out the fabrics while I'm there - which sounds easy because I only need four.  In my mind I have a picture I took of delphinium in a Paris garden, and I want to use those shades of purple in this quilt.  I find the lavender and dark purple, and I think the purple & pink flowered fabric is the right color, but it's more like a light cotton lawn.  I decide to try it, anyway.  Back at home, I dig through another project I haven't started yet, and find a periwinkle blue - the perfect final shade I need. 

The flower picture - at least the periwinkle is correct.
Then I dig up the photo from our trip to France, and I discover the colors are completely different.  Oh, well!  I've already searched out and found this combination, so I decide to go forward with it.  

The instructions also say that the value (lightness to darkness) of the fabrics is very important.  I take my trusty black and white photo to test my selections, and I'm happy with the results.  Time to start cutting!

My favorite quilting tool - my camera!

I'm ready to start slicing but I have a delay of about six months before it happens, because I need to finish my niece Alaina's quilt (remember this is 2016).  Once her quilt is finished I start catching up with each step, though I hold back from peeking ahead, so each month is still a mystery.
Finally, in June 2016 - everything's in nice and neat piles.

one block
We end up forming two main blocks.  I'm happy with the way it's appearing, but I'm having a bit of trouble with the flowered purple and pink material.  I use almost a quart (it seems like!) of Mary Ellen's Best Press (a quilting starch) on it, and it just absorbs it and stays as soft and supple as it was when I prewashed it.  Where did all the starch go??  It should be stiff as a board.  In hindsight, I should have used a lightweight fusible or stabilizer with it.  (At least now I know what to do if I decide to try to quilt with some of the Liberty lawns.)

two block
Naturally, the slippery floral fabric is the one used for all the sharp pointy triangles and half square triangles.  It slithers all over the place (even with lots of pins), so don't look too carefully at the piecing!  I do get to play with another toy I brought with me to Japan - the Tri Rec Triangle rulers.  They work well, though it's hard to be perfect with the thin shifting fabric.  I think the rulers make it easier to piece the skinny triangles because first you simply cut out a strip of fabric.  Then you use the ruler to cut out the triangles along the strip - the first one you cut the other two sides, but after that it only takes one cut to create your triangle.  Maybe a picture from the ruler instructions will help explain it:


Cut, flip the ruler, cut again, repeat all down the strip of fabric.

The edges of the triangles are bunted, so it's easy to line up the two triangles together. 

Do the directions help again?

Normally, you'd have to "guesstimate" exactly where the triangles should line up before sewing, then cut off the tips (or dog ears, in quilting terms).  This method also saves you from having to drag your rotary cutter around three sides of a template, so it's much faster!

A close up of the rectangle formed using the Tri Rec Triangle rulers - see the sharp pointy triangles?

Once we put the blocks into rows, I'm in love with my quilt.  I didn't see the secondary design, the "circles," until I put the blocks together.

Double checking the borders..

The pattern calls for only one border, and I have a small print floral that goes beautifully with the colors in the quilt.  However, it's too busy to be directly beside the quilt center, so I place a thin dark border between the sections.   Since this was a mystery, I had no idea what the final product would look like.  However, if I were to change one thing I'd extend the blue squares the rest of the way to the corners of the border.  I could applique them on now...

Voila!  The top is done.
So I finished this in mid-January 2017 (I'm a little late blogging about it).  I have the backing and binding fabric, but I haven't basted or quilted it yet (Laurel's graduation quilt took precedence).  Maybe I'll get around to it soon...

Saturday, June 17, 2017

Another Graduation Quilt

Laurel's Lace
For most of the previous seven months I've been working on a high school graduation gift for my niece, Laurel.  This one took me a bit longer than normal, though I need to take into account that some of the time has been spent traveling around this side of the world and hosting guests (including having to hide it away when Laurel comes to visit).  With a sigh of relief I'm able to finish before high school ends, and just in time for Steve to personally deliver it a week before the ceremony. 

the picture from the pattern
I email Laurel pages of quilt pictures, and have her choose the design she likes best.  She picks "Charlotte's Lace" by Raija Salomaa.  It's not one of Deb Tucker's patterns, however it does use three of her rulers.  Luckily I have two already and order the third to be sent to my sister's house, so she can bring it to me when she visits.  Then Steve's mother takes Laurel to the paint store to pick out her favorite color swatches, and she mails them to me in Japan.  (And one of the final cottons that go into the quilt I order from a Texas quilt shop - Fabric Fanatics - and have my mother bring when she visits Japan.  So making this quilt is really a family effort!)

Laurel picks out greens and browns, which makes me excited.  Way back when I decided I wanted to learn to quilt, I picked up a book (Learning to Quilt from Leisure Arts - at the time I didn't realize there were places that actually taught classes on quilting).  The book is a sampler pattern of a quilt that finishes 78" x 93", and uses six fabrics.  It recommends that you pick colors that are pleasing to you, and I decide on brown and green - tree colors.  Then I go to the quilt store, and spend two hours choosing material - and end up with a blue and purple quilt (and if you look in my stash today, those colors are the biggest piles).  So after many years, I finally get to make the brown and green quilt!

Nope - the paisley is too dark to use in place of the background.
There are only six fabrics in this quilt, too, but finding them in Japan proves to be a bit of a challenge. (For her sister Alaina's quilt, I was able to pick out the fabric from my stash before I moved to Japan.  Most of the stash is currently in storage in the US, so I couldn't raid it for Laurel's quilt.  The story of Alaina's quilt is here if you'd like to read it.)  

Nope - the light fabric is just the wrong shade.


I look through the fabrics I have with me in Japan, and find one I really like for the background - but I've already started cutting into it a little bit for another project, so I'm a bit short.  I purchased it a Yuzawaya about a month ago, so I return to see if there's more, but they're out.  I spend a day running around to three other Yuzawayas in the Tokyo area, but still no luck.  I also visit Okadaya, Kanda, and Tomato, but I can't find it there, either.  I do end up finding a batik that is similar in color and tone, so I buy that to use for the border if I don't have enough of the hand-dye (Of course, I also bought five other fabrics to see if they might work for the quilt, but I have no luck with them.  Into the Japan stash they go!).  

You'd think this one would work, but it doesn't.


I have a pretty brown material with a traditional Japanese pattern on it, and various greens I've picked up at a Japanese quilt show.  I also have a green fern batik I bought in New Zealand last year...but I'm having the hardest time with fabric #6, which I feel should also be a bold brown with a little bit of green.  I discover olive green does NOT work with the other fabrics in the quilt.  I try various ones, but I have no luck...until my mother arrives with the fabrics I ordered from the US.  Finally, I have all the fabrics selected! 


Neither does this one.


This one's colors shows promise, so I buy it...


...but it's actually a flax & cotton blend, making it rough to the touch.  That won't work for a bed quilt!

We finally have a winner (and one last discard resting on the ironing board)!

parts and pieces of the quilt
Even though I have some of Deb Tucker's rulers, I haven't had a chance to use them until this quilt.  I love them!  She does a wonderful job of putting lots of lines so you can have accurate and precise pieces.  The rulers are also set up so the sections are oversized, and you cut them down to the exact shape.  Some people might find that wasteful, but I like having the little bit of wiggle room to help make sure it's perfect.  It also taught me to pay better attention to my pressing.  I noticed some sections weren't lining up absolutely right with the ruler lines, and it turned out I wasn't quite pressing them all the way open. 

The first completed block!  Only 57 more to go!


See - the horizontal short green strip is pressed in on the left block, and the
horizontal long green strip is pressed out on the right block.  They snug up together
where the blocks are sewn together, in the open seam on top of the pressing bar.
  (The vertical long green strip is pressed out on the left block, so it will match up with
the short green strip when sewn to the row above and below.)
So everything is going well, and I'm really happy with the way the quilt is coming together.  Then I discover a mistake I've made.  When putting the blocks together, the final long green seams are supposed to be pressed out, not in towards the green.  It does make a difference when sewing the blocks together - the green joins across the quilt to look like a sashing, and one long green strip will be pressed out, and the smaller green strip will be pressed in, so they will lock together when sewing.  I spend six hours repressing all those seams...and it also causes the seam to shift slightly because the fabric is now folded the opposite way.  After making the first block I used it as a guide for precisely where the sewing line should go, so I'd end up with a perfect point on all the diamonds and squares.  Repressing causes me to lose some of those points (because of the fabric shift), though I resew some of the worst ones.  It doesn't look horrible, but I'm disappointed to make such a stupid mistake.  I'm definitely triple checking the pressing instructions from now on!

The center - with every seam pressed the right way!
Once that's all fixed I sew the blocks together into rows.  The seams are supposed to be pressed open now (trust me - I triple checked the instructions) and I use a pressing bar to help prevent the iron from accidentally catching the other seams and folding them the wrong way.  It's the first time I've used that toy, too, and it works very well.

Next it's time to test the borders.  I'm happy with the three I've got, though if I were to sew the pattern again I would try making the first border (closest to the center) the same fabric as the one used for the "sashing." (It's not really sashing, because it's in the middle of the completed block - sashing usually refers to a strip of fabric between blocks.)  It might be interesting to see how that frames up the quilt.  The pattern calls for a fourth border, but I don't have enough of the clay background fabric to make it.  The batik I picked out looks like it blends well with the other material, and I decide the quilt does need the final border, so on it goes!

testing the border fabrics

Clipping the loose threads from the back of the quilt...my least favorite ten hours of the quilting process (other than the six hours I spent pressing seams the proper way).

basting the three layers together for the quilt
I try something else new with this quilt - using Hobbs Premium Cotton 80/20 (80% cotton, 20% polyester) as the batting, instead of Warm and Natural.  I want to see how the extra loft (thickness) handles stitching in the ditch (stitching the layers together along the seam lines).  It really sharpens up the shapes and points - I'm in love!  This will be what I use for bed quilts from  now on.  Warm and Natural is pretty flat and dense, so I think it's better when it's used for wall hangings.  Basting the quilt seemed to work much faster and easier with this batting, too.

I mostly quilted in the ditch for this quilt, but I do a little design in the widest border, since the batting recommends quilting every 3.5 inches and the border finishes 4.5 inches wide.  I just mimic the Japanese pattern, and sew split triangles along the Japanese fabric. I use thread in colors to match the top and back.  

Quilted in the ditch - you don't really see the stitches.  (This is a pretty small square - each side is about 1" long...and it's made up of four pieces.  This is an example of how the Deb Tucker rulers help you be precise with your piecing - that's 8 points that have to match up perfectly.

The border quilting - can you see it?

Of course, her name has to be in the quilt!
A picture of the quilting from the backside.


The binding is machine sewn on the front, and I hand sew it to the back.  During the process, Tie-Dye decides the quilt deserves a "Paw of Approval!"  (Don't worry - I wash the quilt before I give it away.)

"My dreams are so good when I'm on Laurel's quilt!"

Can you find the seam lines??
One full size photo of the back...I have some problems with the backing fabric, too.  I find it at Tomato and want 5 1/4 yards, but they only have 4 5/8.  I buy it, and once I decide I like it for the quilt I hope the pattern overstates the amount you need.  A few months later I'm at a quilt show in Tokyo and I find some fat quarters of the same fabric.  I ask if they sell it off the bolt, but they don't, so I just a couple of fat quarters, just in case.  Sure enough, when I measure the finished quilt top my large cut of backing is not enough for the quilt.  I debate what to do (I'm not really a fan of pieced backs with multiple fabrics - it's just not my preference), but then I realize I can cut the fat quarters in half, sew them in a row, and that will give me the extra nine inches I need across the bottom.  So it all works out, and there's just some extra seam lines on the back side.

testing the pillowcase fabrics
I'm actually surprised all the colors work well together in the quilt.  When it came time to make the pillowcase, I have the hardest time picking out three to use for it.  Partly it's because I don't want to use the Japanese fabric for the main part of the body and also because I don't have enough of certain colors, but I finally come up with a combination I'm happy with.  Additionally, I'm able to use more of the new border fabric I bought since
                                                                               I ran out of the clay colored fabric.

The finished quilt, all wrapped up in its matching pillowcase (or storage bag)!

Here's Laurel, with her graduation gift!  I like to name gift quilts with some variation of the pattern title, and this was an easy one since Charlotte's Lace becomes Laurel's Lace.  However, if I was creating my own name, I'd probably have some variation of mint chocolate chip - that's what I kept thinking of when I was working with all this brown and green.

Congratulations, Laurel!